Mrs. Regueiro's Plate: Best Recipes Ever
Showing posts with label Best Recipes Ever. Show all posts

Friday, February 18, 2011

Meyer Lemon Macarons

One of the things that I absolutely love about macarons is how delicate and impressive they look. Do not confuse a macaron (single o) with a macaroon (double oo) because they are not the same cookie at all. One is a delicate sandwiched egg meringue based cookie baked to perfection and the other cookie is simply sweetened using coconut flakes. It seems like a daunting and difficult task to bake up these precious beauties and have been seen everywhere on the foodie-blog-o-sphere. I have had this on my to-do bake list for quite some time and finally set aside some time to mac(aron) it up.

I had been coveting macarons ever since the first moment I had a taste of them from Thomas Keller’s bakery at Bouchon Bakery in Yountville. I fell head over heels in love because the texture of the macaron is absolutely perfect: crispy on the outside, soft and light and chewy on the inside. I have never experienced a cookie quite like it. I had tasted the vanilla bean, dulce de leche, and pistachio macarons and they were all equally impressive and very indulgent cookies. Bites of sheer bliss.

Meyer Lemon Macarons3-1
The key to preparing these macarons is patience. Patience because it’s a waiting game, you prep them to bake and wait for an hour before they can be added to the oven. You could watch an episode of Top Chef or Real Housewives of BH, ATL, or NYC while you wait if you want, too. Then you wait some more until they have cooled down completely before adding the filling, watch more episodes of Top Chef and then you start counting down the clock to eat and enjoy them 24 hours later. After my extensive research from reading foodie blogs of Tartelette, David Lebovitz, and countless other blogs – they all recommend waiting 24 hours. Trust me, it’s macaron magic happening in your refrigerator. You’ll fall in macaron love and catch up on your TV time.

Another key to successfully baking macarons, is to have kitchen tools like a food scale to measure out the ingredients. When properly baked there's a nice "foot" on the macaron – it’s a shiny happy feeling when you see success baking in your oven. I could not help but squealing “yipee” as I saw the feet through the oven window. Then comes the vital part of the macaron…filling the yummy middle with something incredible. Most often they are filled with a flavored buttercream, fruit jam, or chocolate ganache. Either way you decide, go and bake forth yourself a batch of macarons…it is a beautifully crafted cookie.

Helpful Guides: Demystifying Macarons & Making French Macarons
Meyer Lemon Macarons 2
Meyer Lemon Macarons
Adapted from Use Real Butter & Tartelette
Printable Recipe
Ingredients:
110 grams almond meal/flour
200 grams powdered sugar
90 grams aged egg whites (about 3)
zest from 1 meyer lemon
yellow food coloring (powdered or gel)
Filling:
Lemon Curd (about 3 heaping tablespoons)
1 8-ounce container mascarpone cheese

Preparation:

About 24 hours before you plan to bake your macarons, separate your egg whites in a small bowl to age. Keep them covered with loosely covered with saran wrap at room temperature.

In the bowl of your food processor, give your almond meal and powdered sugar a quick pulse. It will help remove any large clumps of nuts and combine your almonds evenly. (Or sift the mixture as well). Add the almond mixture to a medium bowl and whisk in the lemon zest.

In the bowl of the stand mixer with the whisk attachment, whisk your aged egg whites until they get foamy. Once it has thickened, gradually add the sugar until you obtain a glossy meringue. They should look cloud like and stiff. Add the food coloring to your desired color and mix until combined.

Add the almond mixture to the egg whites and gently fold in to incorporate the batter. Do not overbeat the batter, it should look like gooey pancake batter. Transfer your batter to a pastry bag filled with a plain tip (Ateco #7 worked best). Pipe 1.5 inch rounds onto parchment lined baking sheets or silpat.

Once the macarons have been piped, give your cookie sheets a good smack on the counter. This will scare the kids away or your husband in the next room, but it helps to pop any air bubbles. Let it sit at room temperature to dry for 60 minutes until the tops are no longer tacky to the touch.

Preheat the oven to 315 degrees (oven temps can vary especially if you have convection). Bake for 15 to 18 minutes, keeping an eye near the 15 minute mark.

Let the cookies cool completely, and do not remove from parchment paper until cooled.

Prepare the filling, in the bowl of the stand mixer combine the lemon curd and mascarpone cheese. Mix until fully combined. Set aside in the refrigerator until ready to use.

When ready to fill the cookies, pair the macarons together finding the best size for each. Add a teaspoon of filling and lightly spread it across and lightly sandwich the cookies together. Arrange on the cookies on a serving platter, and lightly cover with saran wrap.

Place the finished macarons and let them set in the refrigerator for 24 hours. This is the hardest part to resist the urge to taste a finished cookie once decorated, but they will not taste correct until the next day. The flavors need to time to develop and macerate together. When ready to serve, bring cookies to room temperature and enjoy.
Meyer Lemon Macarons4
Review: Amazing and almost perfect and I had plenty of time to catch up with my dvr’d episodes. My husband jokingly told me to stop baking things that taste so good . His exact words and only because he couldn’t stop eating them for the rest of the week. LOL. My only critique was that they were slightly lumpy in size because I forgot to pulse or sift the almond meal and I need more practice in piping circles. Overall, they were very light and delicate and tasted exactly how I remembered Bouchon’s macarons. I almost thought the macarons were not edible until I bit into one the next day, and yes I did eat a finished one after decorating it. It was not the same texture I had enjoyed but the day after is truly worth waiting for. I might be a little obsessed with baking these now, and you might see a couple more recipes to follow later.  Winking smile

Tuesday, February 15, 2011

Chicken Cacciatore and Pecorino Polenta

I’m a big fan of Bravo’s TV show “Top Chef,” and I was disappointed last week when one of my favorite All-Stars, Fabio Viviani, was sent home. He was hands down my favorite All-Star to watch because of his comedic and playful approach to cooking. The episode for restaurant wars where he works the front of the house was his best performance yet. He showed strong leadership, appreciation to the customers, and his admirable love for everything to deal with food. I thought it would be fitting to pick something from Fabio’s recipes for a special dinner at home to honor my fave All-Star and I wanted something Italian to prepare.

Normally, Eric and I, do not celebrate the festivities of Valentine’s day. We call it the anti-holiday of the year because I don’t need a box of chocolates, overpriced flowers, fancy jewelry, or anything lovey-dovey because we have that every day of the year. (I’m a lucky girl!) Also, because the only holidays we really celebrate and buy gifts for each other are birthdays and anniversaries. Eric went all out this year for my birthday, and bought my fancy DSLR camera that I have been coveting for the past 2 years. Of course, I wanted to thank my love with a wonderful home-cooked meal just because it was Monday and not a stinking lovey-dovey holiday.

This dish was every bit scrumptious and Top Chef worthy. More importantly, it was definitely the perfect way to say I love you and thank you for everything special that you have given to me.

Thanks hubs! Red heart

Enjoy!

Chicken Cacciatore-1

Chicken Cacciatore with Pecorino Polenta
Adapted from Fabio Viviani
Printable Recipe
Ingredients:
8 chicken legs (about 2 pounds)
1 28-ounce can whole peeled tomatoes
2 red onions, sliced
2 cups red wine
8 ounces shitake mushrooms, sliced
1 cup capers
1 cup manzanilla olives, sliced
¼ cup fresh oregano
4 tablespoons olive oil
3 to 5 sprigs of thyme, chopped
6 to 10 garlic cloves, minced
4 cups half and half
2 cups pecorino cheese, grated
2 cups polenta
2 tablespoons unsalted butter


Preparation:


Preheat the oven to 350 degrees.


In a large dutch oven, add a tablespoon or two of olive oil. Add the tomatoes, onions, red wine, mushrooms, olives, oregano and let cook for 45 to 60 minutes.


Meanwhile, place the chicken legs on a large jelly roll pan. Cover with extra-virgin olive oil, salt, a couple tablespoons of chopped garlic and thyme. Bake in the oven for 25 minutes, or until no longer pink.


Add the baked chicken in the tomato mixture, and let soak overnight.


When ready to serve, pressure cook the chicken in tomato sauce for 20 minutes.


Prepare the polenta while the chicken is in the pressure cooker. In a medium dutch oven, add a tablespoon of extra-virgin olive oil and sauté the garlic for 1 minute on medium heat.. Add the half and half, pecorino cheese, and bring to a boil. Slowly add the polenta (cornmeal) in and whisk frequently to prevent clumping, the mixture should come together, reduce the heat to a simmer. Polenta should look smooth. Taste for seasonings and add salt and pepper. Add the 2 tablespoons of butter before serving, and mix until combined.


Serve the chicken cacciatore with pecorino polenta. Garnish with chopped thyme and grated pecorino cheese.

Review: Wow…this was truly a delicious Italian meal and full of bold flavors. Simply delicious. My husband and I ate every single bite, the chicken was falling off the bone tender and paired with the tomato-wine mixture melded beautifully together. The pecorino polenta was simply luscious and smooth with each bite. Definitely a Valentine’s dinner that we enjoyed together. Maybe we’ll have to venture to visit Fabio at his restaurant and try more of his tasty Italian dishes.

Thursday, May 13, 2010

Chewy Walnut Brownies

If I had to choose one dessert that I absolutely love, I would pick brownies. You know the foolproof box-mix brownie. It's all about the gigantic Costco Ghiradelli Triple Chocolate Brownie mix, or the lovable Betty Crocker Turtle Brownie or Betty Crocker Original Supreme Brownie...I love them all. However, I started to make brownies from scratch, and I've never looked back at the box-mixes. But I do miss the chewy texture with a sparkling & crackly top from the box-mixes, you never get that from the homemade version. Until I came across this recipe from my latest issue of Cooks Illustrated and Erin from Dinner & Dessert had made them as well. She has them without my addition of walnuts - Chewy Brownies and they are just as wonderful. After one bite, you'll taste the rich dark chocolate and velvety mix of chunks and buttery walnuts  - it's perfection in a brownie. Enjoy!

Chewy Walnut Brownies
Adapted from: Cook’s Illustrated March/ April 2010 & seen on Dinner & Dessert
Ingredients:
1/3 cup Dutch-processed cocoa
1 ½ teaspoons instant espresso (optional)
½ cup plus 2 tablespoons boiling water
2 ounces unsweetened chocolate, finely chopped
4 tablespoons (1/2 stick) unsalted butter, melted
½ cup plus 2 tablespoons vegetable oil
2 large eggs
2 large egg yolks
2 teaspoons vanilla extract
2 ½ cups sugar (17 ½ ounces)
1 3/4 cups (8 ¾ ounces) unbleached all-purpose flour
¾ teaspoon salt
6 ounces bittersweet chocolate, cut into ½-inch pieces - aka semi-sweet -I used Chocolove dark chocolate
1 cup walnuts, chopped (optional)
Preparation:
1. Adjust oven rack to lowest position and heat oven to 350 degrees. Fit foil into length of 13×9-inch baking pan, pushing it into corners and up sides of pan; allow excess to overhang pan edges. Spray with nonstick cooking spray.
2. Whisk cocoa, espresso powder (if using), and boiling water together in large bowl until smooth. Add unsweetened chocolate and whisk until chocolate is melted. Whisk in melted butter and oil. (Mixture may look curdled). Add eggs, yolk, and vanilla and continue to whisk until smooth and homogeneous. Whisk in sugar until fully incorporated. Add flour and salt and mix with rubber spatula until combined. Fold in bittersweet chocolate pieces.
3. Scrape batter into prepared pan and bake until toothpick inserted halfway between edge and center comes out with just a few moist crumbs attached, 30 to 35 minutes. Transfer pan to wire rack and cool 1 ½ hours.
4. Using foil overhang, lift brownies from pan. Return brownies to wire rack and let cool completely, about 1 hour. Cut into 2-inch squares and serve.

Review: I brought these in my office for my bosses' birthday and everyone fell in love with them. One of my coworkers told me that "It was the best brownie I've ever had in my life." Wow, that's a pretty awesome compliment, and it made my day. I'm going to test out a couple more recipes of brownies to make my final decision but these are a top candidate for my new go-to brownie recipe. This brownie is definitely a keeper!

Monday, April 26, 2010

David Lebovitz's Chocolate Chip Cookies

Cookies are the perfect dessert to me because are bite-sized and always delicious. There are so many desserts that I love: a bite of creamy Vanilla Bean Cheesecake, or the sugary heaven of creme brulee, or even a tasty Tropical Carrot Cake, but there's nothing like a simple chocolate chip cookie. I thought that Alton Brown's The Chewy was the ideal recipe until I came across David Lebovitz's recipe. He's a famous pastry chef that worked at Chez Panisse and certainly knows his a way around the sweet recipes. My next book purchase should be his latest endeavor, Ready for Dessert, where he has updated several of his recipes. The chocolate chip cookie recipe is pretty standard compared to other ones, but there's one step that sets it apart. After you assembled the cookie dough, you roll them into logs and refrigerate for 24 hours. It's a process common with the refrigerator/freezer cookies, but it was worth a try.

If your ideal cookie is slightly crispy on the outside, chewy and gooey in the middle, lots of chocolate chunks, and that all around sweet chocolate chip & nutty flavor...this is the cookie. One of these days, I'll do a side by side comparison of The Chewy, Tollhouse cookies and these ones. You don't have to make all the cookies at once if you don't feel like it, make smaller batches of them all throughout the week if you want. But that's insanity in your fridge, all those wonderful cookies waiting to be baked. That's a crime in my kitchen!


Chocolate Chip Cookies
Source: Serious Eats
Adapted from Ready for Dessert by David Lebovitz
Ingredients:
2 1/2 cups (350 g) all-purpose flour
3/4 teaspoon baking soda
1/8 teaspoon salt
1 cup (8 ounces/225 g) unsalted butter, at room temperature
1 cup (215 g) packed light brown sugar
3/4 cup (150 g) granulated sugar
1 teaspoon vanilla extract
2 large eggs, at room temperature
2 cups (about 225 g) nuts, such as walnuts, pecans, almonds, or macadamia nuts, toasted and coarsely chopped *I used walnuts*
14 ounces (400 g) bittersweet or semisweet chocolate, coarsely chopped into 1/2- to 1-inch (1.5- to 3-cm) chunks *There are chocolate chunks available.*

Preparation:
1. In a small bowl, whisk together the flour, baking soda, and salt.
2. In a stand mixer fitted with the paddle attachment (or in a bowl by hand), beat together the butter, brown sugar, granulated sugar, and vanilla on medium speed just until smooth. Beat in the eggs one at a time until thoroughly incorporated, then stir in the flour mixture followed by the nuts and chocolate chunks.
3. On a lightly floured work surface, divide the dough into quarters. Shape each quarter into a log about 9 inches (23 cm) long. Wrap the logs in plastic wrap and refrigerate until firm, preferably for 24 hours.
4. Position racks in the upper and lower thirds of the oven; preheat the oven to 350°F (175°C). Line 2 baking sheets with parchment paper or silicone baking mats.
5. Slice the logs into disks 3/4 inch (2 cm) thick and place the disks 3 inches (8 cm) apart on the prepared baking sheets. If the nuts or chips crumble out, simply push them back in.
6. Bake, rotating the baking sheets midway through baking, until the cookies are very lightly browned in the centers, about 10 minutes. If you like soft chocolate chip cookies, as I do, err on the side of underbaking.
7. Let the cookies cool on the baking sheets until firm enough to handle, then use a spatula to transfer them to a wire rack.

Yield: 48 cookies...and you'll eat them all.

Review:  I'm adding this as my go-to recipe for chocolate chip cookies because it's the best cookie I've ever had in a long time, and they are marvelous. Gooey, sweet and perfect for dunking in a glass of milk. That's my kind of cookie.

Tuesday, April 13, 2010

Boeuf Bourguignon

I absolutely love and adore Julia Child. I love how funny and witty she was, her grandiose love and devotion to her husband, Paul, and for love of good food, for her countless little quibbles and quotes about how "everything is better with butter" and for what a great role she has played in American cuisine. You can't help but love Julia Child. She once had said that "the only time to eat diet food is while you're waiting for the steak to cook." Hilarious! She was wiser beyond her cooking times, and now an iconic symbol of French cooking. For myself, I am better having a little bit of Julia Child in my life. I had picked this iconic recipe to enjoy for our 2nd wedding anniversary dinner, and knew that just like Julia - it would be a labor of love to create and prepare this dish.

I've been waiting on the day that I would own this cookbook, Mastering the Art of French Cooking. My awesome boss, had recently bought it for me this past birthday. I was tickled pink to own this book and knew it would be like uncovering the lost secrets of Julia Child's kitchen. The book itself is huge, 700 pages for the 1st volume and another 650 for the 2nd volume. If I was Julie Powell, and had to cook the book, all 365 recipes in 365 days...I would flip the effing switch! I do love the format the book reads, Julia Child was very intelligent - it's like she was speaking to you as you read the recipe. The ingredients appear as you use them, without you going back a couple pages or so. Prepare yourself for this recipe, give yourself a good four hours or so, and make this dish. Your husband, friends, and family will love you for making it. I can't wait to make it again for another momentous occasion. Without further adieu, here's the recipe. I included the original formats from the publishing company, Knoft Double Day. Bon Appétit!

Boeuf Bourguignon
Adapted from Julia Child - Mastering the Art of French Cooking, PDF of original recipe
Ingredients:
6 ounces of center-cut bacon
1 tablespoon olive oil
3 pounds lean stewing beef, cut into 2-inch cubes
1 cup carrots, sliced
1 onion, diced
1 teaspoon salt
1/4 teaspoon pepper
2 tablespoon flour
3 cups of red wine, use Pinot Noir or Chianti - use one you would drink
2 to 3 cups beef stock
1 tablespoon tomato paste
2 cloves mashed garlic
1/2 teaspoon thyme
a crumbled bay leaf
18 to 24 small white onions, brown-braised in stock - Recipe below
1 pound quartered fresh mushrooms sautéed in butter - Recipe below
Required tools: 9 to 10 inch dutch oven (casserole) & a slotted spoon
Preparation:
1. Preheat oven to 450 degrees.
2. Sauté the bacon in the oil over moderate heat for 2 to 3 minutes to brown slightly. Remove to a side dish with a slotted spoon. Set casserole aside. Reheat until fat is almost smoking before you sauté the beef.
3. Dry the beef in paper towels it will not brown if it is damp. (Take your time to do this step) Sauté it, a few pieces at a time, in the hot oil and bacon fat until nicely browned on all sides. Add it to the bacon.
4. In the same fat, brown the sliced vegetables. Pour our the sautéing fat.
5. Return the beef and bacon to the casserole and toss with salt and pepper. Then sprinkle on the flour and toss again to coat the beef lightly with the flour. Set casserole uncovered in middle position of preheated oven for 4 minutes. Toss the meat and return to oven for 4 minutes more. (This browns the flour and covers the meat with a light crust.) Remove casserole, and turn oven down to 325 degrees.
6. Stir in the wine, and enough stock so that the meat is barely covered. Add the tomato paste, garlic, and herbs. Bring to simmer on top of the stove. Then cover the casserole and set in lower third of preheated oven. Regulate heat so liquid simmers very slowly for 2 1/2 to 3 hours. The meat is done when a fork pierces it easily. (If you're worried about over-cooking it, it won't happen - lower the heat to your oven to 300 degrees if you're worried about making it too tough.)
7. While the beef is cooking, prepare the onions and mushrooms. Set them aside until needed.
8. When the meat is tender, remove and strain the beef and vegetables from the pot with a slotted spoon and place in a large bowl; set aside.
9. Skim fat off the sauce. (If you're using good quality meat, you'll find no fat.) Simmer sauce for a minute or two, skimming off additional fat as it rises. You should have about 2 1/2 cups of sauce thick enough to coat a spoon lightly. If too thin, boil it down rapidly. If too thick, mix in a few tablespoons of stock. Taste carefully for seasoning. Add back the meat, vegetables, brown-braised onions & sautéed mushrooms. **Recipe may be completed in advance to this point**
10. For immediate serving: Cover the casserole and simmer for 2 to 3 minutes, basting the meat and vegetables with the sauce several times. Serve with buttered potatoes, noodles or rice, and garnish with parsley.
11. For later serving: When cold, cover, and refrigerate. About 15 to 20 minutes before serving, bring to simmer, cover and simmer very slowly for 10 minutes, occasionally basting the meat and vegetables with the sauce.  **Highly recommend serving the next day, because the dish only improves with time. It gains in flavor when reheated.**

For the brown-braised onions - The quickest, neatest, and least tearful way to peel small white onions is to drop them into a saucepan of rapidly boiling water and leave them for 5 to 10 seconds, just long enough for their skins to loosen. Drain. Run cold water. Trim the tops and bottoms, and remove the skin. In a medium pan, add the 2 tablespoons butter and 2 tablespoons of olive oil, just as it's bubbling - add the onions. Add 1/2 cup of beef stock or dry white wine or red wine and add the herb bouquet. (Composed of 4 parsley sprigs, 1/2 bay leaf, and 1/4 thyme tied in cheesecloth.) Cover and simmer for 40 to 50 minutes until onions are perfectly tender, and liquid has evaporated.

For the sautéed mushrooms - In a large skillet, about medium high heat, add 2 tablespoons butter and 2 tablespoons of olive oil. As soon as you see the butter foam, add the mushrooms. Toss and shake the pan for 4 to 5 minutes. During their sauté the mushrooms will at first absorb the fat. Cook until they have browned, and remove from heat.

Review: I've never been to Paris, but I truly enjoy the French cooking! Wow, this was an incredible and memorable meal. As recommended by Julia, I served this with buttered peas, boiled potatoes, french baguette, and bottle of lovely Hess Allomi Vineyard Cab because it's our anniversary wine and it went perfectly with the meal. The meat is so tender that you don't need a knife, and the taste of tenderly slowly braised beef just lingers in your mouth. You'll be oohing and ahhing the entire meal. Julia once said "You don't have to cook fancy or complicated masterpieces - just good food from fresh ingredients." Thank you Julia Child from the bottom of my heart and always hungry stomach.

Tuesday, April 6, 2010

Vanilla Bean Cheesecake

For Easter dinner, I was in charge of dessert. I've been wanting to make this cheesecake recipe for a long time, and knew this would be the perfect occasion to try it out. Also, Eric's uncle - his favorite dessert of all time is cheesecake! I found this recipe at Bake at 350's blog, her cookies and desserts are so beautiful and perfectly crafted, her food looks like artwork. She has a fantastic photo step-by-step post of the recipe, too. The main reason why I picked this recipe was the use of vanilla bean paste in the recipe. You could easily substitute vanilla extract, but the vanilla bean paste gives the beautiful black flecks in the creamy white cheesecake. I bought mine at Sur La Table and it could be found at speciality cake shops, too. I'm sorry Cheesecake Factory, but this recipe supercedes your original cheesecake!

Vanilla Bean Cheesecake
Adapted from Bake at 350 source from King Arthur Flour
Ingredients:
Graham Cracker Crust:
1 & 3/4 cups crushed graham crackers
4 tablespoon melted butter
4 teaspoon. sugar
1/8 teaspoon coarse salt
1. Combine all ingredients. Press into the bottom of a 9" springform pan. Bake at 350for 10 minutes. Let cool completely.
Cheesecake:
3 (8 oz) packages cream cheese, room temperature
1 & 1/2 cups sugar
1/4 teaspoon coarse salt
4 eggs
3 tablespoons freshly squeezed lemon juice
2 tablespoons of lemon zest
1 tablespoon vanilla bean paste
1 cup sour cream, full fat
1/2 cup heavy cream
Sanding sugar*optional*
Preparation:
1. Preheat the oven to 325.
2. On low speed, beat the cream cheese until no lumps remain; scraping down the sides as needed. Add the sugar and salt and beat until combined. Add the eggs one at a time until the mixture is smooth before adding the next egg. Scrape the bottom of the bowl after each addition.
3. Stir in the lemon juice, lemon zest, vanilla bean paste, sour cream and heavy cream until smooth.
4. Pour onto the cooled crust and bake 50 minutes or so until the edges are set and the cheesecake is a light golden brown. The middle will still jiggle when the pan is shaken.
5. Turn off the oven, crack the door and let the cheesecake cool in the oven for 1 hour. (This helps prevent cracking.) The center will finish setting in the oven.
6. After 1 hour, remove the cheesecake from the oven and run a knife around the edge of the pan.
Raspberry Sauce
2 teaspoon cornstarch
3 tablespoon sugar
1/3 cup water
12 ounces frozen raspberries, thawed
Preparation
1. In a small saucepan, stir together the cornstarch, sugar and water. Add the raspberries and cook over medium heat. Stir constantly until the mixture boils. Continue stirring and boil one additional minute.
Pour the sauce into a mesh sieve placed over a bowl to remove seeds. The sauce can be served warm or cold. Store in the refrigerator.
When serving the cheesecake, I cut the slices for everyone, drizzled the raspberry sauce, and added little bits of sanding sugar for that extra touch of Krystal love! Everyone loved how my cheesecake sparkled!
Review: PPPPPPPPPP--EEEEEEEEE--RRRRRRR---FECT!!!!! I love this cheesecake just as much as my go-to Mascarpone Cheesecake. This was a nice change up and a great recipe to be enjoyed with the family. The tang from the lemon and the vanilla bean paste was a creamy heaven, a very classic take on the dish. Happy belated Easter everyone!

Wednesday, January 6, 2010

Pecan Tarts

I still remember the first time I had these pecan tarts. My godparents were in town for Christmas and brought a beautiful cookie jar filled with these sweet treats. After the first bite, I was in love with them. After the second bite, they were all gone. Perfect little bites of heaven. These pecan tarts were miniature versions of pecan pie, and better than any store-bought treats. All my sisters and I begged Tita Marcy for the recipe because we knew we had to have them again...and also because we finished the entire batch of pecan tarts! My sisters and I have been making them ever since which is at least 12 years or maybe more.

There are only a couple of special occasions that I will make these because they are pretty labor intensive and hands-on messy. When I wanted to impress a certain guy with my non-cooking skills, and I was only a baker...I baked them for his 20th birthday. He loved them so much that he married me. (Eric still remembers that birthday dinner because although I failed miserably on dinner, my dessert was pretty good). When I wanted to make something special for my co-workers, I made 4 batches and put them in Christmas themed treat bags so everyone could have their own. One time I hadn't made them in awhile, and Eric had wanted me to make them for his cookie exchange party...I completely forgot about the eggs! Also there was another time, my birthday cousin, wanted to learn to make them and we spent maybe about 6 hours in the kitchen doing them. She got pecan pieces in her eye...and refused to bake after that!

Nowadays, I always make them ONLY for Christmas because it's my holiday treat for everyone to enjoy. (I told you I wouldn't forget Natalie!) I hadn't made them in 2 years because I was in fear of losing my touch. Baking them in my kitchen this time around was ideal because I finally had the space for a mini assembly line and clean-up was a cinch with a dishwasher. It's like riding a bike making these treats, it gets easier every time. Caution: Once you have one...you won't stop!

Pecan Tarts
Adapted from my godmother, Tita Marcy
Printable Recipe
Sweet Dough:
1/2 cup butter, room temperature (1 stick)
1 bar of cream cheese, at room temperature
1 1/2 cups of all-purpose flour
Filling:
3 large eggs
1 1/2 cups butter (1.5 stick)
2.5 cups of tightly packed brown sugar
1 cup chopped pecans (Chop coarsely in a mini-cup food processor)

Preparation:

1. Mix the dough ingredients together, I could have done this in my KA mixer. But this is an old school recipe, I use my hands for this. I use a mixer to get it going, but to really get the mixture blended...my hands are my best tool. It's just like kneading bread dough, and I want the perfect flaky crust.
2. Make little balls of dough, about a quarter size to fill my little muffin pans. I use a mixture of mini muffin tins. (24 Cup Minis but I prefer these denser 12 cup ones).
3. Place the balls into the muffin tins. Repeat with the rest of the sweet dough.
4. Melt the butter in a small saucepan. Add the brown sugar. Mix the 3 eggs together, and slowly temper the hot butter mixture with the egg. Slowly add in all together and mix well.
5. Using my fingers, shape the balls into the mini muffin tin. Make sure the bottoms are not to thin or the filling will seep through.
6. Add 1 tablespoon of filling each tart and top with 1 teaspoon of chopped pecans.
7. Bake at 350 degrees for about 20 minutes or until golden brown.

Review: Eat them warm, or at room temperature. I have tried using the tart tamper a couple years ago, and it didn't work well. Whenever I would use the tamper, it would stick to the dough. So I prefer using my hands for everything in this recipe. Hands-on is the best technique. Either way, they will disappear from your lips and onto your hips and that's why I only make them once a year. Hope you make them Natalie and thanks Tita Marcy for the making this the first time. It's been a keepsake recipe for the family to enjoy.

One batch is about 48. During Christmas, I'll make about 5 batches...it only takes me 4 hours or so.

Wednesday, December 16, 2009

Sugar Cookies w/Royal Icing


"It's beginning to look a lot like Christmas" has been running in my mind these past 2 weeks. I've been on a mad baking operation these past 2 weeks, and it's been all about the cookies lately. I think my kitchen assembly line for cookies was pretty efficient. Day 1: Prep cookies and bake. Prep colored royal icings. Day 2: DECORATE! After baking & decorating these sugar cookies, I realized that I love chocolate and other cookies more. These cookies are VERY time consuming, but the best sugar cookies as well. I've had this bookmarked from Ashlee from A Year in The Kitchen FOREVER, and I knew her recipe was the best because Katie from Good Things Catered uses this cookie recipe for all their fabulous cookies. I envy these girls because they make it look so simple and perfect, like better than store-bought cookies! But I figured if they can do it, so can I. I was determined to be in the holiday spirt with my sugar cookies!

This was also my first attempt at making sugar cookies & decorating with royal icing. I bought myself all the proper tools with my Michael's coupons. I bought a couple cute holiday cookie cutters - candy cane, snowflake, star, Christmas tree & gingerbread man. For the royal icing treatment, I bought the Wilton meringue powder because I didn't feel like using egg whites to ice up my tasty cookies. I also stocked up on some Wilton gel pastes in colors of Christmas red, Christmas Green, and the basics of yellow, black & sky blue. I highly recommend using Wilton gel pastes vs. food coloring, it really does give that vibrant high quality color that you are looking for. I also prepped a self-guide on what colors I would be using and on what cookies. Yellow to the stars, red for gingerbread man, green for trees, and so forth. You'll also need to invest in the disposable pastry bags because it really does help for your clean lines and flooding and icing...believe me! Ziploc bags are not the equivalent!!! It also helps to prepare the icing the day before you decorate the cookies, it helps the color set. Most importantly, these are simply the best sugar cookies, I love the hint of lemon & almond that these cookies have...you can't stop eating them. If you decide to venture and make these cookies, set aside some time, at least 2 days, and be ready to bake and conquer!


Ashlee's Famous Sugar Cookies
Adapted by Ashlee from A Year In the Kitchen & seen on Good Things Catered

Ingredients:
1 1/2 cups butter
1 1/2 cups granulated sugar
1/2 cup powdered sugar
4 eggs
1 tsp. vanilla
1/2 tsp. almond extract
1 tbsp. lemon zest
5 cups flour
2 tsp. baking powder
1 tsp. salt
Powdered sugar, for rolling

1.Preheat oven to 400 degrees.
2. Cream butter and sugars in a mixer for 5 minutes. Add in eggs one at a time, mixing thoroughly. Add in vanilla, almond, and lemon zest. Sift in flour, baking powder, and salt a little at a time. Do not over mix, this process should take about one minute.
3. Chill dough for up to a week in the fridge, or roll out and cut right away.
*For these, I rolled the dough extra thin, placed on cookie on the sheet, pressed in the stick, and topped it with another*
4. Line a cookie sheet with silpat and bake cookies for 12 minutes.
5. Wait until cookies are cool before icing. I used the infamous royal icing.
Bake at 350's blog is very helpful, too. Please read her guide for flooding and icing techniques...it really does help!

Review: Time-consuming, tiring, but overall a pretty darn sweet cookie. It might be awhile before I attempt to do this crazy baking adventure again, but I might have to enlist on help from my sister or a couple of girlfriends. Isn't this the prettiest cookie ever?

Monday, November 16, 2009

Steak Au Poivre

Whenever Eric & I crave a hearty and delicous steak, we "used" to dine at Ruth Chris Steak house, Morton's, Wood Ranch, Prime Cut Cafe is my newest favorite steak place. However, my husband, aka pyro-afficiando, loves this recipe from Alton Brown because it inspired him to cook like our steak house restaurants. Getting restaurant quality at home is our number one mantra right now. It's alot easier to make this meal at our current house than our small Yorba Linda apartment...I think we burned the exhaust fan...it never ran the same after that incident! I love this meal for many reasons: 1)the pyro-show - seeing Cognac flames is quite entertaining and fearing for my life is next; 2) it's the best steak recipe ever; 3) it's an elegant meal for anyone. Try it, fire it up, and eat it up...because it's that good. Trust me.


Steak Au Poivre
Adapted from Alton Brown
4 tenderloin steaks, 6 to 8 ounces each and no more than 1 1/2 inches thick
Kosher salt
2 tablespoons whole peppercorns
1 tablespoon unsalted butter
1 teaspoon olive oil
1/3 cup Cognac, plus 1 teaspoon
1 cup heavy cream
Preparation:
1. Remove the steaks from the refrigerator for at least 30 minutes and up to 1 hour prior to cooking. Sprinkle all sides with kosher salt.
2. Coarsely crush the peppercorns with a coffee grinder - it's much easier on the hands than using a mortar and pestle. Spread the peppercorns evenly onto a plate. Press the fillets, on both sides, into the pepper until it coats the surface. Set aside.
3. In a medium skillet over medium heat, melt the butter and olive oil. As soon as the butter and oil begin to turn golden and smoke, gently place the steaks in the pan. For medium-rare, cook for 4 minutes on each side. Once done, remove the steaks to a plate, tent with foil and set aside. Pour off the excess fat but do not wipe or scrape the pan clean.

4. Off of the heat, add 1/3 cup Cognac to the pan and carefully ignite the alcohol with a fire starter. Gently shake pan until the flames die. Return the pan to medium heat and add the cream. Bring the mixture to a boil and whisk until the sauce coats the back of a spoon, approximately 5 to 6 minutes. Add the teaspoon of Cognac and season, to taste, with salt. Add the steaks back to the pan, spoon the sauce over, and serve.
Review: Best steaks ever...it's the kind of dish that I would lick the plate clean. All the steakhouses can't come close to this meal. I did scream my head off due to the proximity of the fire in my face, but luckily I was holding the fire extinguisher, too!

Friday, November 13, 2009

Company Pot Roast

As far back that I can remember, my mom cooked mainly Filipino dishes for us. The smells of vinegar and garlic would linger in the house, and you would know that it was chicken adobo night. I wouldn't trade any of my childhood memories of food, I loved everything that my mom made for us. She always made sure we had something good to eat. There were rare occasions that she would make something out of the box for her, she never really liked to go outside her comfort box. (We would have spaghetti with hot dogs, who does that?) That's where I'm different from my mom, she cooked one genre of cooking, I like them all. Lately, I've been focusing on American comfort food, and I'm like a kid at a candy store! It's been exciting and adventurous to taste different cultures of food.

I came across Ina Garten's Pot Roast while watching one of her many loved episodes of Barefoot Contessa. I've been in love with using my dutch oven since the cold weather has slowly appeared in SoCal. This is an easy recipe to follow, and most of the ingredients were easy to find at my farmers market. This was my first opportunity to use leeks and knew that they would resemble a huge green onion with lots of sand. (Be careful and clean them well under running water). This is a great pot roast recipe, and my first try at it....this is a dish worth making.


Company Pot Roast
Adapted from Ina Garten
Ingredients:
(4 pound) prime boneless beef chuck roast
Kosher salt and freshly ground black pepper
All-purpose flour
Good olive oil
2 cups chopped carrots (3 carrots)
2 cups chopped yellow onions
2 cups chopped celery
2 cups chopped leeks, white and light green parts
5 large garlic cloves, peeled and crushed
1.5 cups good red wine, Cabernet
2 tablespoons brandy
1 (28-ounce) can whole plum tomatoes in puree
1 cup chicken stock, preferably homemade
1 chicken bouillon cube
3 branches fresh thyme
2 branches fresh rosemary
1 tablespoon unsalted butter, at room temperature

Directions
1. Preheat the oven to 325 degrees F.
2. Pat the beef dry with a paper towel. Season the roast all over with 1 tablespoon salt and 1 1/2 teaspoons pepper. Dredge the whole roast in flour, including the ends. In a large Dutch oven, heat 2 tablespoons olive oil over medium heat. Add the roast and sear for 4 to 5 minutes, until nicely browned. Turn and sear the other side and then turn and sear the ends. This should take 4 to 5 minutes for each side. Remove the roast to a large plate.
3. Add 2 tablespoons olive oil to the Dutch oven. Add the carrots, onions, celery, leeks, garlic, 1 tablespoon salt, and 1 1/2 teaspoons pepper and cook over medium heat for 10 to 15 minutes, stirring occasionally, until tender but not browned. Add the wine and brandy and bring to a boil. Add the tomatoes, chicken stock, bouillon cube, 2 teaspoons salt, and 1 teaspoon pepper. Tie the thyme and rosemary together with kitchen string and add to the pot. Put the roast back into the pot, bring to a boil, and cover. Place in the oven for 2 1/2 hours, until the meat is fork tender or about 160 degrees F internally. Turn the heat down to 250 degrees F after about an hour to keep the sauce at a simmer.
4. Remove the roast to a cutting board. Skim off as much fat as possible from the sauce. Remove the meat from the dutch oven and using a hand processor puree half of the sauce until smooth. (I liked my chunky, so puree at your discretion). Place 2 tablespoons flour and the butter in a small bowl and mash them together with a fork. Stir into the sauce and simmer for 2 minutes, stirring until thickened. Taste for seasonings. Slice the meat and serve warm with the sauce spooned over it.

Review: Honestly, the best meal that I have made recently. The hubs said it should be put in my top ten list, and that it was better than my Pumpkin Beer Braised Ribs. I really had no expectations for this dish, because we have never had pot roast before. The meat was really tender from the slow roasting, and the flavors from leeks, onions, carrots and red wine were mighty tasty. The entire house was infused with the sweet smells of pot roast, a very intoxicating smell of rosemary and thyme. Thyme, I love you - you are my new favorite herb. You add so much to the dish. I didn't waste the gravy on this either, I saved it for a mashed potatoes and gravy kinda day.

Thursday, October 8, 2009

California Tri-Tip Chili

This past week my husband's work held a chili-cook-off competition. My husband was eager to participate and determined to make the best chili possible. We've been researching recipes, and tasting ones that we love. Pinks Hotdogs has the best chili hot dog ever. We love the sweet and smooth velvety chili - it's heaven on top of a hot dog, it's worth waiting 2 hours in line to get that darn hot dog. Also our other top choice for chili is Ruby's Diner, they serve chili cheese fries at the Angel Stadium that are too die for. It's a meal in itself that contains a basket of golden crunchy fries with savory velvety chili topped with chunks of shredded tender beef, green onions and cheddar cheese. OMG, it's heaven. Using our heads, we tried our hardest to find a recipe similar to both of our top favorite chili's. It was quite impossible with the endless chili recipes out there, not even a copy-cat version is available for Pinks or Ruby's Diner.

However, we decided to make one of our favorite chef's ultimate chili, Tyler Florence's Ultimate Chili. But after looking at several of the reviews, and looking at the ingredients - I was leery about it. My husband had reviewed several recipes, and handpicked this one to make. But I did more research, and found a great one on Epicurious that might match our taste buds. I switched it up on him at the last minute and he wasn't aware of the new recipe until the night he prepared it. But I had to convince him that this recipe would be a winner. It's pretty hard to find a no-bean chili with tri-tip, and most chili's are made with sirloin or ground beef. We changed the main ingredient because the original asks for brisket. It's not a meat choice that we prefer, and tri-tip was the key ingredient found in our Ruby's Diner chili. This chili does take some serious time to make, and my husband did most of the work for this one. I just bought all the ingredients and prepped the butternut squash for him. If you have the time, please make this chili, it is sure worth eating!

*Disclaimer: Husband won the chili cook off competition, bragging rights to him were rewarded. I'm not taking credit for this recipe, but I'm proud of my husband. He's a great cook, too!


California Tri-Tip Chili
Adapted from Epicurious

Ingredients:
Chili:
3 large dried ancho chiles
3 ounces bacon & pancetta, diced
3/4 pounds yellow onions, chopped (about 2 cups)
2 to 3 lb tri-tip roast, cut into 2 1/2- to 3-inch cubes
Coarse kosher salt
3 large garlic cloves, peeled
1 tablespoons chili powder
1 teaspoons cumin seeds
1/2 teaspoon dried oregano
1/2 teaspoon ground coriander
3/4 teaspoons coarse kosher salt
1 10-ounce cans fire-roasted diced tomatoes
3/4 of 12-ounce bottle dark ale beer *We used Newcastle*
1 4-ounce can diced roasted green chiles
1/4 cup finely chopped fresh cilantro stems
2 cups 1 1/2- to 2-inch chunks seeded peeled butternut squash

Preparation:
1. Place chiles in medium bowl. Pour enough boiling water over to cover. Soak until chiles soften, at least 30 minutes and up to 4 hours.
2. Preheat oven to 350°F. Sauté bacon & pancetta in dutch oven over medium-high heat until beginning to brown. Add onions. Reduce heat to medium; cover and cook until tender, about 5 minutes. Sprinkle beef all over with coarse salt and pepper. Add to pot; stir to coat. Set aside.
3. Drain chiles, reserving soaking liquid. Place chiles in blender. Add 1 cup soaking liquid, garlic, chili powder, cumin seeds, oregano, coriander, and 3/4teaspoons coarse salt; blend to puree, adding more soaking liquid by 1/4 cupfuls if very thick. Pour puree over tri-tip in pot. Add tomatoes with juices, beer, green chiles, and cilantro stems. Stir to coat evenly.
4. Bring chili to simmer. Cover and place in oven. Cook 2 hours. Uncover and cook until beef is almost tender, about 1 hour. Add squash; stir to coat. Roast uncovered until beef and squash are tender, adding more soaking liquid if needed to keep meat covered, about 45 minutes longer. Season chili to taste with salt and pepper. Tilt pot and spoon off any fat from surface of sauce.

DO AHEAD: Can be made 2 days ahead. Cool 1 hour. Chill uncovered until cold, then cover and keep chilled.

Review: One of the best chili's that I have tasted, the addition of the butternut squash is so amazing. I'm so in love with this vegetable, roasting the butternut squash in the last hour gives the chili so much depth. We were questioning the addition of butternut squash with the chili if it would hold well, comparing it to potatoes - it does not have that bland taste or the mushiness of a sweet potato. The nuttiness and creaminess of butternut squash blends perfectly with the chili. We're already planning to make another batch of chili. YIPEE!

Tuesday, April 28, 2009

World's Best Lasagna

Want a certain someone to fall madly in love with you? Make them this lasagna. Looking to smooth things over with your girlfriend or sister? Cook 'em this lasagna. Want to bring about world peace and harmony? Serve this lasagna. To everyone. It's really that good, just ask my hungry husband.World's Best Lasagna
Adapted from Allrecipes.com

3/4 pound sweet Italian sausage*casings removed*
3/4 pound lean ground beef
1/2 cup minced onion
2 cloves garlic, crushed **added a couple extra because I love garlic**
1 (28 ounce) can crushed tomatoes *I used diced tomatoes*
2 (6 ounce) cans tomato paste
2 (6.5 ounce) cans canned tomato sauce
1/2 cup water
2 tablespoons white sugar
1/2 teaspoons dried basil leaves
1/2 teaspoon fennel seeds
1 teaspoon salt
1/4 teaspoon ground black pepper
4 tablespoons chopped fresh parsley
12 lasagna noodles **I used the entire box**
16 ounces ricotta cheese**Double this if you prefer a cheesier lasagna like me!*
1 egg
1/2 teaspoon salt
3/4 pound mozzarella cheese, sliced
3/4 cup grated Parmesan cheese
*12 Pepperoni slices*
*1 pound grated Fontina cheese
*6 basil leaves, chiffoned
*2 oz pancetta, chopped
*1 tablespoon of Johnny's Garlic Spread & Seasoning **Best seasoning & garlic spread ever MADE!*

DIRECTIONS
1. In a 7 quart Dutch oven, cook sausage, ground beef, onion, and garlic over medium heat until well browned.
2. Stir in crushed tomatoes, tomato paste, tomato sauce, and water. Season with sugar, basil, fennel seeds, Italian seasoning, 1 teaspoon salt, pepper, and 2 tablespoons parsley. Simmer, covered, for about 1 1/2 hours, stirring occasionally. **Using a hand blender, I mixed everything to combine well. It helped unify the sauce.*
3. Preheat oven to 375 degrees F (190 degrees C).
4. Bring a large pot of lightly salted water to a boil. Cook lasagna noodles in boiling water for 8 to 10 minutes. Drain noodles, and rinse with cold water.
5. In a mixing bowl, combine ricotta cheese with egg, remaining parsley, basil, pancetta and 1/2 teaspoon salt.
6. To assemble, spread 1 1/2 cups of meat sauce in the bottom of a 9x13 inch baking dish, *I have a huge lasagna pan. Arrange 6 noodles lengthwise over meat sauce. Spread with one half of the ricotta cheese mixture. Top with a third of mozzarella cheese slices. Spoon 1 1/2 cups meat sauce over mozzarella, and sprinkle with 1/4 cup Parmesan cheese. Top with pepperoni slices. Repeat layers, and top with remaining mozzarella and Parmesan cheese.
7. Cover with foil: to prevent sticking, either spray foil with cooking spray, or make sure the foil does not touch the cheese.
8. Bake in preheated oven for 25 minutes. Remove foil, and bake an additional 25 minutes. Cool for 15 minutes before serving.

Review: This dish freezes well, and I always end up with extra sauce that I use for pasta later on in the week. I have made this lasagna about 3 times already, and this was the best I have ever made it. It's so good that my own mom requested that I make it for her!

Monday, April 13, 2009

Osso Bucco & Risotto Milanese

I wanted to make a nice memorable dinner for our 1st wedding anniversary. Usually our home meals consist of meat and rice, or something with bread or potatoes. Eric had recently purchased an eight quart dutch oven that I had been eyeballing for some time now, and I knew I had to use it for this dinner. I've been dying to make Osso Bucco because the meat is so juicy, and tender...it literally falls off the bone. Osso Bucco is braised veal shanks with carrots, celery, onions and tomatoes. It's a great peasant dish, and also it was my first attempt at making this dish. I did my research on the best recipe to use, and best place to get the specialty meat, center-cut veal shanks. I even contacted my April knottie chef, Gerrie, to go over the details and my anixety of cooking a new dish. I invited our fave double date couple, Adrian and Monica, over to share the meal, too. They brought over the same exact bottle of wine that we drank on our wedding day, Hess Collection Wine from Mount Veeder - 2006. Overall, the dish was wonderful, and every bite was savory and delicious! It wasn't that hard to prepare, but a tasty dish worth every effort!
Osso Bucco & Risotto Milanese
**Using my wonderful new 8 quart Dutch Oven**
6 veal shanks
Salt and pepper
Flour
2 Tbsp olive oil
4 Tbsp butter
1 cup diced onion
2/3 cup diced carrot
2/3 cup diced celery
1 cup dry white wine
2 strips lemon zest
1 cup chicken stock
1 1/2 cup tomatoes in juices
1 tsp fresh thyme
2 bay leaves
3 - 4 parsley sprigs
Gremolada
1 tsp grated lemon zest
1/4 tsp finely minced garlic
1 Tbsp minced Italian parsley
Some notes from Marcella Hazan:- Veal shanks are best no thicker than 1 1/2 inches, otherwise they will not cook evenly.- Do not remove the white skin/membrane around shank, it adds flavor and creaminess to the dish. Make sure you allot enough time for the meat to cook, at least 2 to 3 hours for cooking.
Preparation:
1. Preheat the oven to 350 degrees. Tie each shank tightly with a piece of cooking twine to prevent them from falling apart during cooking. Season the shanks with salt & pepper. Flour both sides of the veal shank and pat off the excess.
2. Heat two tablespoons of olive oil in a Dutch oven over medium high heat. Sear the shanks on both sides until a brown crust forms, remove to a plate and set aside.
3. Turn down the heat to medium and add 4 tablespoons of butter to the Dutch oven. Add the onion, carrot, and celery and cook until the vegetables have softened. Add the wine and cook until it no longer smells alcoholic.
4. Nestle the shanks back into the vegetables. Add the lemon zest, chicken stock, tomatoes, thyme, bay leaf, and parsley. Bring the contents to a simmer, cover, and transfer to the oven.
5. Let it cook in the oven for about 2 - 3 hours or until the shanks are fork tender. Baste the shanks by basting the cooking liquid over them every 20 - 30 minutes.
6. If the pot is getting too dry, add a few tablespoons of water.
Optional step: After the shanks are done, carefully remove them from the pot and set aside on a plate. Puree the contents in the pot (the veggies and braising liquid) with an immersion blender for a more uniform sauce. Serve the osso buco over risotto Milanese. Carefully snip the twine around the shank and spoon the sauce over it. Top with a spoonful of the gremolada.
Risotto Milanese
Adapted from "Joy of Cooking"
1 Tbsp olive oil
3 Tbsp butter
1/4 medium onion, finely diced
2 cups Arborio rice
A small pinch of saffron threads
1/4 cup hot water
1/4 cup dry white wine
3 cups chicken stock
1 Tbsp cold butter
1 1/2 cups grated Parmigiano Reggiano
Note:- Do not rinse the rice, the starches on the outside of the grains is what makes the risotto creamy.- The chicken stock must be hot when you add it to the rice, so keep it in a saucepan on low heat on the stove while you're cooking. - Add the saffron threads to the hot water and let it steep.
1. Heat the olive oil and butter in a saucepan over medium heat. Add the onions and cook until softened. Add the rice and cook until the rice is coated with fat and starts to turn translucent around the edges.
2. Lower the heat to medium low, add the wine and cook while stirring until the wine has been absorbed. Add one cup of the chicken stock, keeping it at a simmer, and cook uncovered while stirring constantly until almost all of the liquid as absorbed.
3. Add the chicken stock about 1/3 cup at a time until the liquid is absorbed. Keep it at a low simmer, and cook the rice while stirring constantly.
4. About 15 minutes in, after the chicken stock has been absorbed, add the saffron water (threads too) and continue to cook and stir. If you start running low on chicken stock, go ahead and use hot water or more chicken stock. Continue adding ladlefuls of broth, waiting until each addition has been almost absorbed before adding more.
5. Cook while constantly stirring until the rice is al dente, fully cooked but still retains a chew in the center. Take off heat and stir in a tablespoon of cold butter and grated Parmigiano.

Clearly a hearty dish that we ate to the bones!!!!!!! **TIP, save the bones for stock!***

Monday, March 23, 2009

New Mexican Spice Rubbed Pork Tenderloin with Sweet Potato Tamales

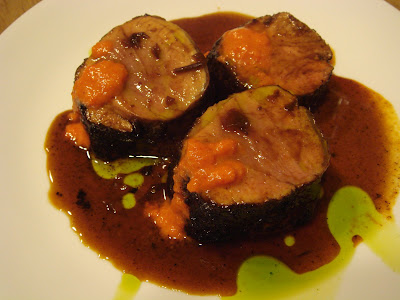
My husband fell in love with this meal so much that he requested it for his birthday. Two years ago, my favorite date couple and us had visited Mesa Grill in Las Vegas. This was the dish I had enjoyed, and I bought the book right away. The pork tenderloin by itself is really juicy and has all those wonderful Southwestern spices and twists that Bobby Flay often uses. I had prepared myself with 2 extra days for food prep. The most time consuming part of these dishes were the sauces and the tamales. I truly felt like a saucier! I'll have to make another post for the Red Pepper sauce and the cilantro oil that you see on top of the pork tenderloin. It gives a great additional kick and splash of color. I don't know if I could do a Throwdown with Bobby Flay, but I certainly can cook one of his dishes! Enjoy!

New Mexican Spice Rubbed Pork Tenderloin, served with Sweet Potato Tamales & Pecan Butter
Adapted from Mesa Grill, Bobby Flay


Main Ingredients:
2 tablespoons olive oil
1 (2 pound) pork tenderloin
New Mexican Spice Rub, recipe follows
Bourbon-Ancho Sauce, recipe follows
Sweet Potato Tamale with Pecan Butter, recipe follows

Preparation:
1. Preheat oven to 400 degrees F.
2. Heat olive oil in a medium saute pan, over high heat. Season pork with salt on both sides. Dredge pork in the spice rub and tap off any excess.
3. Sear the pork on both sides until golden brown. Cook in the oven to medium doneness, about 8 to 10 minutes.
4. Let pork rest for 5 minutes before slicing into 12 slices. Plate 3 slices per plate. Drizzle with the Bourbon-Ancho Sauce. Also, drizzle with Roasted Red Pepper sauce, Cilantro oil, and chopped chives for garnishment. Place a Sweet Potato Tamale, topped with Pecan Butter next to the slices of pork.


New Mexican Rub:3 tablespoons ancho chile powder
2 tablespoons light brown sugar
1 tablespoon pasilla chile powder
2 teaspoons chile de arbol powder
2 teaspoons ground cinnamon
2 teaspoons allspice
Kosher salt
Combine all ingredients in a small bowl.

Bourbon-Ancho Sauce:
2 tablespoons olive oil
1 large red onion, finely chopped
2 cups plus 2 tablespoons bourbon
3 ancho chiles, soaked, seeded, stems removed and pureed
5 cups low-sodium chicken broth
1 cup apple juice concentrate, thawed
8 whole black peppercorns
1/4 cup packed light brown sugar
Kosher salt

Preparation:
1. Heat olive oil in a medium saucepan over medium-high heat. Add the onions and cook until soft.
2. Add the bourbon and cook until completely reduced. Add the remaining ingredients and cook until reduced by half.
3. Strain through a fine mesh strainer, return mixture to the pan, and cook to sauce consistency, add the remaining 2 tablespoons of bourbon and cook for 2 minutes. Season with salt.


Sweet Potato Tamales:
24 dried corn husks
4 cups fresh or frozen corn kernels, preferable fresh
1 small redonion, chopped
1 1/2 cups water
9 tablespoons unsalted butter (1 stick plus 1 tablespoon), melted
2/3 cup fine yellow cornmeal
1 tablespoon honey
Salt and freshly ground pepper
1 large or 2 medium sweet potato, roasted at 375 degrees for about 1 hour or until soft, then peeled and flesh mashed
2 teaspoons ground cinnamon
1/2 teaspoon ground cloves
1 teaspoon ground allspice
2 tablespoons maple syrup
Pecan Butter, recipe follows


Preparation:
1. About 2 hours before you plan to form the tamales, clean the husks under running water. Soak them in warm water for 2 hours, or until softened.
2. Puree the corn, onion, roasted garlic, and stock in a food processor. Transfer the mixture to a mixing bowl and cut in the butter. Using your fingers, mix in the cornmeal, honey, and salt and pepper until there are no visible lumps of fat.
3. Fold in the sweet potato puree, cinnamon, cloves, allspice, and maple syrup. The mixture will be a lot looser than you think it should be, but when the tamales are steamed it will dry out.
4. Remove the cornhusks from the water and set aside the best 20 husks. Drain and pat dry.
5.Tear the remaining husks into 1-inch wide strips to be used for tying. Lay 2 husks flat on a work surface, with the tapered ends facing out and the broad bases overlapping by about 3 inches.
6. Place about 1/3 cup of masa mixture in the center. Bring the long sides up over the masa, slightly overlapping, and pat down to close. (If the masa drips out a little at the seam, that is no problem.)
7. Tie each end of the bundle with a strip of cornhusk, pushing the filling toward the middle as you tie. Trim the ends to about 1/2-inch beyond the tie. Arrange the tamales in a single layer on a steaming rack, cover tightly with foil, and steam over boiling water for 45 minutes.
8. To Serve: slice a slit on top of each tamale and push both ends of the tamale toward the middle to expose the masa. Top each with 1 tablespoon of Pecan Butter.

Pecan Butter:
12 tablespoons (1 1/2 sticks) unsalted butter, at room temperature
1/4 cup toasted pecans, toasted and finely chopped
3 tablespoons pure maple syrup
1/4 teaspoon ground cinnamon
Kosher Salt and freshly ground pepper
Combine the butter, pecans, maple syrip, and cinnamon in a bowl. Season with salt & pepper and mix well. *Tip, I use a mini food processor to mix everything.* Scrape onto a sheet of plastic wrap, form into a log, and wrap well. Refrigerate until solid, at least 2 hours and up to 24 hours. Remove from the refigerator 10 minutes before using to soften slightly.


***It's one of the best meals that I have enjoyed cooking and eating! But I do prefer the restaurant experience, it's always nice to re-create that savory moment at home, too!***

Tropical Carrot Cake with Coconut Cream Cheese Frosting

This past weekend was filled with wonderful food and lots of cooking for me. I'm soooooo exhausted of all the food prep that went into making the Bobby Flay dinner. However, the biggest highlight of my cooking was the dessert that I made for my husband: Tropical Carrot Cake. I found this recipe from Delicious Meliscious because she made it for her birthday, and I fell in love with it right away. My husband is very finicky on carrot cake...because it's his favorite cake, and he got 2nd place at his work for baking his Carrot cake using Alton Brown's recipe.

This was my first time baking a carrot cake, and it's going to be a recipe I'll be using everytime!!!!!!! Hands down, this is the best cake ever, everyone fell in love with it, and my husband told me that it was the best cake he's ever had! It's so moist, and tasty - the pineapple and coconut and macadamia give the cake a fresh balance of flavors. I toasted the coconut, put some extra nuts all around the cake...it was so pretty! It's just a perfect cake, that I'm creating a new category for my best recipes ever. This is the first one to go in, and I found the cutest candles to put on the cake, too!
Tropical Coconut Cake with Coconut Cream Cheese Frosting
Ingredients:
1 cup macadamia nuts (I recommend chopping these up or crushing them)
3 cups all purpose flour
3 cups sugar
1 tbsp baking soda
1 tsp salt
1 tbsp ground cinnamon
½ tsp ground nutmeg
1 ½ cups sweetened flaked coconut
4 large eggs
2 tbsp vanilla
1 ½ cups vegetable oil, such as canola or safflower
1 ½ cups shredded peeled carrots
1 ½ cups diced fresh pineapple or drained crush canned pineapple (this is one 20 oz. can)
1/2 cup sweetened cream of coconut, such as Coco Lopez *Located in your liquor aisle*
Coconut-Cream Cheese Frosting
3 (8 oz) packages cream cheese, at room temperature
1 ½ cups powdered sugar
¼ cup heaving whipping cream
¼ cup sweetened cream of coconut, such as Coco Lopez
½ tsp salt

Preparation:
1. Preheat the oven to 350F. Arrange the nuts on a baking sheet in a single layer and toast them for 7 to 9 minutes, until golden and aromatic. Set aside to cool.
2. Place one oven rack one-third from the bottom of the oven and the second two-thirds from the bottom. Line three 9-inch cake pans with parchment paper rounds, grease with butter, and dust with flour (or spray with Baker’s Joy).
3. Stir together the flour, sugar, baking soda, salt, cinnamon, nutmeg, coconut, and nuts in a large bowl. In another large bowl, whisk together the eggs, vanilla, oil, carrots, pineapple, and cream of coconut. Pour the egg mixture into the flour mixture and stir until combined.
4. Pour the batter into the prepared cake pans. Stagger the cake layers on the oven racks so that no layer is directly over another. Set 2 layers on one rack and the third on the other. Bake for 30 to 35 minutes.
5. The cakes are done when they are golden brown on top and a toothpick inserted into the center comes out clean. Cool the cakes in their pans on racks for 5 minutes, then invert them onto the racks and cool completely, about 15 to 20 minutes.

To Make the Frosting:
1. Using a mixer fitted with a paddle attachment, beat the cream cheese and powdered sugar in a large bowl on medium-high speed about 1 minute. Add the whipping cream, cream of coconut, and salt; beat until combined.
2. Place 1 cake layer on a serving plate and spread a thick blanket of frosting on top. Add the second layer, spread thickly with frosting, and top with the third layer. Cover the top and sides of the cake with an even layer of frosting.
Sidenote*Take a look at the how to guide for layering a cake.* After the cake has cooled, use a sharp serrated knife long enough to cut the cake layer.Sometimes when you bake a cake, the edges end up a little crusty, or the middle part is higher than the rest of the cake. **But you'll get to eat the leftovers, best way to sample your dish!**

3. Cover the top and sides of the cake with an even layer of frosting. The cake can be covered with plastic wrap and refrigerated up to 4 days. If you’re feeling energetic and there is frosting left over, use a pastry bag fitted with a decorative tip to pipe a decoration around the top rim of the cake.
4. Let it cool in the refrigerator about 1 hour before covering, to ensure the frosting has hardened and will not stick to the plastic wrap.
Yield: 12-14 Servings.

Seriously, hands down the best carrot cake or cake in general....I'll be making this for Mother's Day again. I can't wait!!!!

Wednesday, December 3, 2008

Mascarpone Cheesecake with Almond Crust

I must admit this is the best cheesecake I've ever made to date. I hadn't made it since April, and this is my fave dessert for parties! This was the perfect treat for everyone to enjoy at our family party. My uncle who has had my cheesecake before thought I did something different. I was like no, what are you talking about??? He was like it's sooooo creamy, and I thought about it because I contemplated what I had done differently. I worked on getting that perfect almond crust, it wasn't mushy as I had made in the past. I used pure vanilla extract from Williams-Sonoma, and I picked lemons from our backyard....and I used my Kitchen Aid Mixer!! A-ha...all those factors, have made the best cheesecake ever!!! Seriously, the creaminess of the cream cheese & mascarpone, and the hint of lemon...truly melt in your mouth. I hope I can duplicate recipe for next time!! The water bath for the cheesecake is the best way to cook it as well. Thank you Giada for showing me your family's favorites!! The only item I omitted was the chocolate topping, but you can add that if you like, but the cheesecake is perfect either way!

Mascarpone Cheesecake with Almond Crust
Ingredients
Crust:
1 cup slivered almonds, lightly toasted
2/3 cup graham cracker crumbs
3 tablespoons sugar
3 tablespoons unsalted butter, melted**I always add extra butter*
Filling:
2 (8 oz) packages cream cheese, room temperature
2 (8 oz) containers mascarpone cheese, room temperature
1 1/4 cups sugar
2 teaspoons fresh lemon juice
1 teaspoon vanilla extract
4 large eggs, room temperature
Topping: **I omitted this process, but feel free to add - I have done this before, and it's delicious*
1/2 cup chocolate-hazelnut spread aka NUTELLA
1/4 cup whipping cream

Preparation:
For the crust, preheat oven to 350 degrees F.
1. Tightly wrap the outside of a 9-inch diameter springform pan with 2 3/4-inch-high sides with 3 layers of heavy-duty foil. *Make sure it's heavy-duty, the water will get into your pan if you don't do this.* Finely grind the almonds, cracker crumbs, and sugar in a food processor. Add the butter and prcoess until moist crumbs form. Press the almond mixture onto the bottom of the prepared pan (not on the sides of the pan). Bake the crust until it is set and beginning to brown, about 12 to 15 minutes. Cool. Decrease the oven temperature to 325 degrees F.
2. For the filling, Using my kitchen aid mixer, beat the cream cheese, mascarpone cheese, and sugar in a large bowl until smooth, occasionall scraping down the sides of the bowl with a rubber spatula. Beat in the lemon juice and vanilla. Add the eggs, one at a time, beating until just blended after each addition.
3. Pour the cheese mixture over the crust in the pan. Place the springform pain in a large roasting pan. Pour enough hot water into the roasting pan to come halfway up the sides of the springform pan. Bake until the center of the cheesecake moves slightly when the pan is gently shaken, about 1 hour 5 minutes (the cake will become firm when its cold). Transfer the cake to a cooling rack, cool for 1 hour. Refrigerate until the cheesecake is cold, at least 8 hours and up to 2 days.
*For the topping, combine the nutella and cream in a small bowl. Heat in the microwave until warm, stirring every 20 seconds to blend, about 1 minute. Cut the cake into wedges, and drizzle the chocolate sauce over the wedges and serve!*
Enjoy, because I know my family & I sure did!!!!!
Pin It button on image hover