Mrs. Regueiro's Plate: March 2009

Tuesday, March 24, 2009

Cilantro Oil & Smoked Red Pepper Sauce

Here's the follow-up to my Mesa Grill post. The relishes on the dishes that compliment them to perfection! I love the vibrant color of the cilantro oil, and the spicy kick from the Smoked Red Pepper sauce...it gives a good amount of heat and a beautiful touch to the dish. It helps create those unforgettable Mesa Grill dishes with fresh flavors.

Adapted from Mesa Grill Cookbook - Chapter Relishes, Sauces & more

Cilantro Oil
Makes about 3/4 cup
Ingredients:
1 1/2 cups canola oil
1 cup packed fresh cilantro leaves (stems included)
10 fresh spinach leaves
1/2 teaspoon kosher salt
Preparation:1. Combine the oil, cilantro, spinach, and salt in a food processor and mix for 5 minutes.
2. Strain through a fine-mesh strainer (don't press on the solids, or the oil will get cloudy) into a bowl. This can be made up to 2 dys in advance and refrigerated. Bring to room temperature before serving.
Smoked Red Pepper SauceMakes about 2 1/2 cups
Ingredients:4 red bell peppers, roasted, peeled, seeded, and chopped
1/2 small red onion, coarsely chopped
4 cloves roasted garlic, peeled
1/4 cup red wine vinegar
1 tablespoon honey
1 tablespoon Dijon mustard
1 tablespoon chiptole chile puree
Kosher salt and freshly ground black pepper
1/2 cup canola oil
Preparation:
1. Combine the red peppers, onion, garlic, vinegar, honey, mustard, and chiptole puree in a blender, season with salt and pepper, and blend until smooth. 2. With the motor running, slowly add the oil and blend until emulsified.
3. Strain the sauce into a bowl. This sauce can be made 1 day in advance and refrigerated.
I have the perfect sauce bottles for these two wonderful sauces. I'll probably make a mini Bobby Flay meal using the sauces or use them sparingly on whatever dishes I have. These will keep in the fridge for at least a month! Yipee!

Monday, March 23, 2009

New Mexican Spice Rubbed Pork Tenderloin with Sweet Potato Tamales

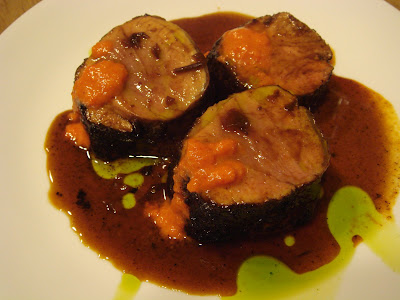
My husband fell in love with this meal so much that he requested it for his birthday. Two years ago, my favorite date couple and us had visited Mesa Grill in Las Vegas. This was the dish I had enjoyed, and I bought the book right away. The pork tenderloin by itself is really juicy and has all those wonderful Southwestern spices and twists that Bobby Flay often uses. I had prepared myself with 2 extra days for food prep. The most time consuming part of these dishes were the sauces and the tamales. I truly felt like a saucier! I'll have to make another post for the Red Pepper sauce and the cilantro oil that you see on top of the pork tenderloin. It gives a great additional kick and splash of color. I don't know if I could do a Throwdown with Bobby Flay, but I certainly can cook one of his dishes! Enjoy!

New Mexican Spice Rubbed Pork Tenderloin, served with Sweet Potato Tamales & Pecan Butter
Adapted from Mesa Grill, Bobby Flay


Main Ingredients:
2 tablespoons olive oil
1 (2 pound) pork tenderloin
New Mexican Spice Rub, recipe follows
Bourbon-Ancho Sauce, recipe follows
Sweet Potato Tamale with Pecan Butter, recipe follows

Preparation:
1. Preheat oven to 400 degrees F.
2. Heat olive oil in a medium saute pan, over high heat. Season pork with salt on both sides. Dredge pork in the spice rub and tap off any excess.
3. Sear the pork on both sides until golden brown. Cook in the oven to medium doneness, about 8 to 10 minutes.
4. Let pork rest for 5 minutes before slicing into 12 slices. Plate 3 slices per plate. Drizzle with the Bourbon-Ancho Sauce. Also, drizzle with Roasted Red Pepper sauce, Cilantro oil, and chopped chives for garnishment. Place a Sweet Potato Tamale, topped with Pecan Butter next to the slices of pork.


New Mexican Rub:3 tablespoons ancho chile powder
2 tablespoons light brown sugar
1 tablespoon pasilla chile powder
2 teaspoons chile de arbol powder
2 teaspoons ground cinnamon
2 teaspoons allspice
Kosher salt
Combine all ingredients in a small bowl.

Bourbon-Ancho Sauce:
2 tablespoons olive oil
1 large red onion, finely chopped
2 cups plus 2 tablespoons bourbon
3 ancho chiles, soaked, seeded, stems removed and pureed
5 cups low-sodium chicken broth
1 cup apple juice concentrate, thawed
8 whole black peppercorns
1/4 cup packed light brown sugar
Kosher salt

Preparation:
1. Heat olive oil in a medium saucepan over medium-high heat. Add the onions and cook until soft.
2. Add the bourbon and cook until completely reduced. Add the remaining ingredients and cook until reduced by half.
3. Strain through a fine mesh strainer, return mixture to the pan, and cook to sauce consistency, add the remaining 2 tablespoons of bourbon and cook for 2 minutes. Season with salt.


Sweet Potato Tamales:
24 dried corn husks
4 cups fresh or frozen corn kernels, preferable fresh
1 small redonion, chopped
1 1/2 cups water
9 tablespoons unsalted butter (1 stick plus 1 tablespoon), melted
2/3 cup fine yellow cornmeal
1 tablespoon honey
Salt and freshly ground pepper
1 large or 2 medium sweet potato, roasted at 375 degrees for about 1 hour or until soft, then peeled and flesh mashed
2 teaspoons ground cinnamon
1/2 teaspoon ground cloves
1 teaspoon ground allspice
2 tablespoons maple syrup
Pecan Butter, recipe follows


Preparation:
1. About 2 hours before you plan to form the tamales, clean the husks under running water. Soak them in warm water for 2 hours, or until softened.
2. Puree the corn, onion, roasted garlic, and stock in a food processor. Transfer the mixture to a mixing bowl and cut in the butter. Using your fingers, mix in the cornmeal, honey, and salt and pepper until there are no visible lumps of fat.
3. Fold in the sweet potato puree, cinnamon, cloves, allspice, and maple syrup. The mixture will be a lot looser than you think it should be, but when the tamales are steamed it will dry out.
4. Remove the cornhusks from the water and set aside the best 20 husks. Drain and pat dry.
5.Tear the remaining husks into 1-inch wide strips to be used for tying. Lay 2 husks flat on a work surface, with the tapered ends facing out and the broad bases overlapping by about 3 inches.
6. Place about 1/3 cup of masa mixture in the center. Bring the long sides up over the masa, slightly overlapping, and pat down to close. (If the masa drips out a little at the seam, that is no problem.)
7. Tie each end of the bundle with a strip of cornhusk, pushing the filling toward the middle as you tie. Trim the ends to about 1/2-inch beyond the tie. Arrange the tamales in a single layer on a steaming rack, cover tightly with foil, and steam over boiling water for 45 minutes.
8. To Serve: slice a slit on top of each tamale and push both ends of the tamale toward the middle to expose the masa. Top each with 1 tablespoon of Pecan Butter.

Pecan Butter:
12 tablespoons (1 1/2 sticks) unsalted butter, at room temperature
1/4 cup toasted pecans, toasted and finely chopped
3 tablespoons pure maple syrup
1/4 teaspoon ground cinnamon
Kosher Salt and freshly ground pepper
Combine the butter, pecans, maple syrip, and cinnamon in a bowl. Season with salt & pepper and mix well. *Tip, I use a mini food processor to mix everything.* Scrape onto a sheet of plastic wrap, form into a log, and wrap well. Refrigerate until solid, at least 2 hours and up to 24 hours. Remove from the refigerator 10 minutes before using to soften slightly.


***It's one of the best meals that I have enjoyed cooking and eating! But I do prefer the restaurant experience, it's always nice to re-create that savory moment at home, too!***

Tropical Carrot Cake with Coconut Cream Cheese Frosting

This past weekend was filled with wonderful food and lots of cooking for me. I'm soooooo exhausted of all the food prep that went into making the Bobby Flay dinner. However, the biggest highlight of my cooking was the dessert that I made for my husband: Tropical Carrot Cake. I found this recipe from Delicious Meliscious because she made it for her birthday, and I fell in love with it right away. My husband is very finicky on carrot cake...because it's his favorite cake, and he got 2nd place at his work for baking his Carrot cake using Alton Brown's recipe.

This was my first time baking a carrot cake, and it's going to be a recipe I'll be using everytime!!!!!!! Hands down, this is the best cake ever, everyone fell in love with it, and my husband told me that it was the best cake he's ever had! It's so moist, and tasty - the pineapple and coconut and macadamia give the cake a fresh balance of flavors. I toasted the coconut, put some extra nuts all around the cake...it was so pretty! It's just a perfect cake, that I'm creating a new category for my best recipes ever. This is the first one to go in, and I found the cutest candles to put on the cake, too!
Tropical Coconut Cake with Coconut Cream Cheese Frosting
Ingredients:
1 cup macadamia nuts (I recommend chopping these up or crushing them)
3 cups all purpose flour
3 cups sugar
1 tbsp baking soda
1 tsp salt
1 tbsp ground cinnamon
½ tsp ground nutmeg
1 ½ cups sweetened flaked coconut
4 large eggs
2 tbsp vanilla
1 ½ cups vegetable oil, such as canola or safflower
1 ½ cups shredded peeled carrots
1 ½ cups diced fresh pineapple or drained crush canned pineapple (this is one 20 oz. can)
1/2 cup sweetened cream of coconut, such as Coco Lopez *Located in your liquor aisle*
Coconut-Cream Cheese Frosting
3 (8 oz) packages cream cheese, at room temperature
1 ½ cups powdered sugar
¼ cup heaving whipping cream
¼ cup sweetened cream of coconut, such as Coco Lopez
½ tsp salt

Preparation:
1. Preheat the oven to 350F. Arrange the nuts on a baking sheet in a single layer and toast them for 7 to 9 minutes, until golden and aromatic. Set aside to cool.
2. Place one oven rack one-third from the bottom of the oven and the second two-thirds from the bottom. Line three 9-inch cake pans with parchment paper rounds, grease with butter, and dust with flour (or spray with Baker’s Joy).
3. Stir together the flour, sugar, baking soda, salt, cinnamon, nutmeg, coconut, and nuts in a large bowl. In another large bowl, whisk together the eggs, vanilla, oil, carrots, pineapple, and cream of coconut. Pour the egg mixture into the flour mixture and stir until combined.
4. Pour the batter into the prepared cake pans. Stagger the cake layers on the oven racks so that no layer is directly over another. Set 2 layers on one rack and the third on the other. Bake for 30 to 35 minutes.
5. The cakes are done when they are golden brown on top and a toothpick inserted into the center comes out clean. Cool the cakes in their pans on racks for 5 minutes, then invert them onto the racks and cool completely, about 15 to 20 minutes.

To Make the Frosting:
1. Using a mixer fitted with a paddle attachment, beat the cream cheese and powdered sugar in a large bowl on medium-high speed about 1 minute. Add the whipping cream, cream of coconut, and salt; beat until combined.
2. Place 1 cake layer on a serving plate and spread a thick blanket of frosting on top. Add the second layer, spread thickly with frosting, and top with the third layer. Cover the top and sides of the cake with an even layer of frosting.
Sidenote*Take a look at the how to guide for layering a cake.* After the cake has cooled, use a sharp serrated knife long enough to cut the cake layer.Sometimes when you bake a cake, the edges end up a little crusty, or the middle part is higher than the rest of the cake. **But you'll get to eat the leftovers, best way to sample your dish!**

3. Cover the top and sides of the cake with an even layer of frosting. The cake can be covered with plastic wrap and refrigerated up to 4 days. If you’re feeling energetic and there is frosting left over, use a pastry bag fitted with a decorative tip to pipe a decoration around the top rim of the cake.
4. Let it cool in the refrigerator about 1 hour before covering, to ensure the frosting has hardened and will not stick to the plastic wrap.
Yield: 12-14 Servings.

Seriously, hands down the best carrot cake or cake in general....I'll be making this for Mother's Day again. I can't wait!!!!

Thursday, March 19, 2009

Happy Birthday hubby!

My husband had his birthday this past Wednesday. He came home early, we played a little rock band and relaxed at home. My birthday was pretty amazing, and I knew that I couldn't top the spa day and give him a gift as big as the T.V. Eric didn't want any of that, so I planned a simple menu for his birthday. He did request a special menu, but that will be shared on Saturday with our friends. I'm recreating the Mesa Grill experience once again!! The birthday menu was: Burgers, fries & my homemade coffee toffee walnut brownies!
I did surprise him with the candle on the brownie, and sang to him! He requested a large glass of milk to accompany his brownies. Our burgers were pretty tasty. I made garlic-pesto burgers with carmelized onions! Topped them with melted provolone cheese. Man....they were tasty!!!

The burgers were made by me as well, I mixed ground sirloin and hot Italian sausage in the food processor. Added some seasonings, chopped garlic, and a little worchestire sauce and seasoning salt to add some flavor. The burgers were really juicy and tasty! I loved add the pesto with the burgers, it gives such a nice bite to the burger! In case you need it, here's the recipe to making your home-made pesto. It tastes alot better than store-bought versions!

Pesto Recipe
2 cups fresh basil leaves, packed
1/2 cup freshly grated Parmesan-Reggiano
1/2 cup extra virgin olive oil
1/3 cup pine nuts
3 medium sized garlic cloves, minced
Salt and freshly ground black pepper to taste
Preparation:
1. Combine the basil in with the pine nuts, pulse a few times in a food processor. Add the garlic, pulse a few times more.
2. Slowly add the olive oil in a constant stream while the food processor is on. Stop to scrape down the sides of the food processor with a rubber spatula. Add the grated cheese and pulse again until blended. Add a pinch of salt and freshly ground black pepper to taste.
Makes 1 cup.

Thanks Sarah!!!!!!!

Yesterday I received my What's Cooking Spring Exchange gift! This is my first time participating with the What's Cooking board, and to my surprise...my assigned Elfster was Sarah and she was already on my blog reader list! I did my research on her and hopefully put together a nice gift for her to receive from me as well. **Sarah, I hope you get it today or tomorrow!**We went back and forth on questions for each other, and it was fun emailing each other back and forth. I opened the box to find lots of treats for me to make and 3 large cookbooks!!!!!!!


**YUMMY, chocolate chips are a girl's best friend!**

Sarah, you hit it right on the money! I love to host parties, and entertain my guests...all the dips you provided me are perfect!! I can't wait to try them ALL! The cookbooks are awesome as well...I'll be pretty busy trying to read and comb through these books. I love Italian food, and the Indian cookbook will be fun as well! OMG...the cookies cookbook is filled with cookies that I love! I am super grateful and can't thank you enough for your wonderful gifts.
Thanks so much again Sarah!!!

Tuesday, March 17, 2009

Walnut-Pesto Crusted Turkey

One of the magazines that I subscribe to is Everyday with Rachel Ray, but she's not my favorite chef. I do like the simplicity of her dishes. She's funny and quirky, the modern day Martha Stewart, and she has truly capitalized on "30 minute meals." In the magazine, there is a pullout for her Weekly Menus. I liked this one the best and because it was really quick and simple to make. I served it along with Parmesan couscous and roasted asparagus.

Walnut-Pesto Crusted Turkey
Adapted from Rachel Ray's Everyday Menu Planner

Ingredients:
2 Large Eggs
1/2 cup pesto - I make my own, you can use store-bought.
1 cup walnuts, finely ground
3/4 cup breadcrumbs
4 turkey breast cutlets
3 tablespoons of unsalted butter
Lemon wedges, for serving

Preparation:
1. In a medium bowl, beat the eggs. Add the pesto to a second medium bowl. In a third bowl, mix the walnuts and breadcrumbs. Add the turket cutlets to the pesto, turning to coat. Working with one at a time, dip the cutlets into the walnut mixture, then the eggs, then the walnut mixture again to coat.
2. In a large cast iron skillet, heat the butter over medium heat. Add the cutlets, lower the heat to low and cook, turning once, until golden-brown, 5 to 6 minutes on each side, serve with lemon wedges.

Wednesday, March 11, 2009

Turkey Sloppy Joe Sliders

Sloppy joes are the essential classic American dish, and my version is slightly sweet and healthy for you! I don't think I've ever had the Manwich version of a sloppy joe, but everyone tells me that it's sweet and tangy. I love making this meal whenever I need something quick and simple. I usually use whole wheat hamburger buns, but I thought the sweet hawaiian rolls would make a perfect mini meal. Enjoy!


Turkey Sloppy Joe Sliders
Adapted: Original Krystal recipe, Not from MANWICH
Ingredients:1 lb ground turkey
1 onion, diced
1 red bell pepper, diced
4 cloves garlic, minced
1- 8 oz tomato can
2 tablespoons tomato paste
1 tablespoon cumin
1 tablespoon sazon seasoning
1 tablespoon cooking wine
1 tablespoon honey
1 tablespoon Worcestershire sauce
Salt & Pepper to taste
Small Dinner Rolls like Hawaiian Sweet Bread Rolls

Preparation:
1. Heat a large non-stick skillet with 2 tablespoons of Olive oil, and sauté the onion/garlic/peppers over medium-high heat for 5 minutes. Add the ground turkey, breaking up the meat into crumbles as it cooks.
2. Stir in the rest of the ingredients, reduce heat to low, and simmer for 5 minutes more.
3. Place a half-cup scoop of the mixture onto each bun and serve. I served it with sweet potato fries, it was a great messy meal!

Monday, March 9, 2009

Carrots are good for you!

Spring is almost here, and I'm really excited because there are lots of things I have planned for this month. We will be planting our herb garden, add some flowers to the front yard of our house, and work on our gardening skills. One of my favorite spring desserts is carrot cake. I love the flavors of carrot cake because it's so moist and fresh, it always brings a smile to my face! I knew I had to try this cupcake recipe from Williams-Sonoma because it was the perfect bite of sweetness that I was looking for. I would add some walnuts for more texture, but it truly was a sweet treat!

Carrot Cupcakes with Mascarpone Frosting
Adapted: Williams-Sonoma


Ingredients:
1/3 cup butter, at room temperature
3/4 cup granulated sugar
1 Tbs. maple syrup or honey *I used honey.
1 Tbs. finely grated orange zest
2 eggs
1 cup grated carrot
1 cup plus 2 Tbs. all-purpose flour
2 tsp. baking powder
7 Tbs. fresh orange juice, warmed
1 tsp. baking soda
For the mascarpone icing:
6 Tbs. (3/4 stick) unsalted butter, at room temperature
1 1/2 cups confectioners’ sugar
1 tsp. grated lemon zest
4 oz. cold mascarpone or low-fat cream cheese
Strips of dried mango for garnish (optional)

Directions:
1.Preheat an oven to 350°F. Line 10 standard muffin cups with paper liners.
2. In the bowl of an electric mixer, beat together the butter, granulated sugar, maple syrup and orange zest until pale and creamy. Beat in the eggs one at a time. Stir in the carrot.
3. In a bowl, sift together the flour and baking powder. In another small bowl, stir together the orange juice and baking soda.
4. Stir the flour mixture into the butter mixture in two additions, alternating with the orange juice mixture in two additions until smooth. Do not overbeat or the cupcakes will be tough.
5. Spoon the batter into the prepared muffin cups.
6. Bake until the cupcakes are risen and lightly golden, about 20 minutes.
7. Transfer the pan to a wire rack and let the cupcakes cool for 10 minutes, then turn them out onto a baking sheet and let cool completely, about 1 hour.
8. To make the mascarpone icing, in the bowl of an electric mixer, beat together the butter and confectioners sugar until light and fluffy. Stir in the lemon zest and mascarpone until blended. When the cupcakes are cool, frost them and garnish with strips of dried mango. Cupcakes may be stored in an airtight container for up to 3 days. Makes 10 cupcakes.

Adapted from New Healthy Kitchen Series, Desserts, by Annabel Langbein (Simon & Schuster, 2006).
**I'm sharing these cupcakes with a girlfriend, I can't leave these all at home to eat for Eric and me!!**

Adventures at Portillos

So I've been dreaming about this chocolate cake shake ever since Elisa and Kara have been talking about it. I was planning a trip out to Chicago to check this place out and meet Kara as well!! However, to my surprise - there are 2 California locations, Buena Park & Moreno Valley. Luckily, the Buena Park location is only 15 minutes away from our house. I was absolutely tickled pink, I couldn't wait to get my hands on that shake! Eric and I headed out to Portillos this past Friday. We're big fans of the famous Pinks Hollywood hot dogs and knew we had to check this place out! Here's my adventure at Portillos:I've seen this place before but I never paid much attention to it...and now it holds a warm place in my tummy! Nice bright lights welcome you outside.

We were waiting in line to place our order and there are cute signs everywhere...AND a reminder of what you should order. Portillo Chocolate Cake, my mouth started the drooling.

My cute husband waiting patiently for our order to be called. *Eric ordered a chili cheese hot dog.*The line cooks are pretty fast putting up the orders, we probably waited less than 10 minutes for our order.
My order, the Italian meat with sweet peppers...it was a big sandwich, it was really warm and tasty!
Eric & I shared the cheese fries...nom nom nom.

HELLOOOOOOOOOOO, chocolate. I'm having a love affair with Portillos tonight!

I'm trying really hard to not get a brain freeze, it's really hard to suck the cake out of the straw! OMG...it was delicious, the little pieces of cake and chocolate is heaven in your mouth! ::drooling::
Unforunately, this is the best I could do...that's how much I drank. Sorry Kara, I didn't mean to waste it, but it was enough for my tummy.

The verdict...Portillos is a great hot dog place, but my vote for best hot dog place, Pinks is still number one! The chocolate cake shake is the best thing here. Don't worry Kara, I'll still plan a trip out to see you, but you'll also have to experience Pinks Hot Dogs, too!

Thursday, March 5, 2009

Cuban Picadillo

Picadillo is Eric's home style comfort food, and one of the easiest to make as well. It's best described as a cuban-style hash and is a popular dish in Latin America, and there is a similar recipe from the Phillipines as well. In the beginning of my cooking adventures, this was Eric's dish to make for me whenever we wanted a cuban dinner. He would cook this meal for me and I would get a nice break from the kitchen. However, this is the one dish that I learned by watching and "by ear" and it's just as good as my husbands version.

*NOTE: This is my best attempt at the amounts that I've used since there are no "written recipes" for cubans!! This is best served with plantains, but I didn't have any on hand, so the next best thing was bananas!! Also, this is always better the next day, and you can use any leftover meat to make those savory pastelitos!!! YUM!

Cuban Picadillo
Adapted from my husband & MIL
Ingredients:
1 pound ground beef
¾ cup of Raisins
1 handful of pimiento-stuffed green olives
½ cup dry white wine
1 ½ tablespoons of  Olive oil
1 8 oz. can of tomato sauce
1 teaspoon of tomato paste
4 garlic cloves, minced
1 medium onion, chopped
1 green bell pepper , chopped
2 tablespoons of cilantro, chopped finely
2 tablespoons of cumin
a pinch of cumin seeds
1 1/2 teaspoons of Sazon Seasoning **Mainly sold at latin supermarkets**
2 bay leaves
salt & pepper to taste

Preparation:
1.Heat oil in a large dutch oven over medium-high heat.
2. Prepare the sofrito, which is the Cuban trinity, consisting of onions, garlic & bell peppers. Add the sofrito to the pan and sauté until onions are soft, about 4 to 5 minutes.
3. Add ground beef and sauté until cooked. Add all remaining ingredients except the cilantro.
4. Simmer until picadillo thickens, stirring occasionally, about 10 minutes. Season to taste with salt and pepper.
5. Add the cilantro and discard the bay leaves. Serve picadillo over a bed of white rice, and plantains.

Review: This is a quick meal to make whenever we're in a mood for some Cuban comfort food, and it always puts Eric in good spirits. He says its a nice reminder of his mom's home cooking. Enjoy!

Tuesday, March 3, 2009

Coconut Lemon Almond Cake

I have a very large meyer lemon tree in my backyard, so I'm always looking for ways to use them up and give them away. I love baked goods with lemon, i.e. lemon tarts, lemon bars, lemon shortbreads, lemon poppy seed muffins, lemon everything, right?? Well, I came across this recipe and knew it would be perfect. I had the perfect amount of buttermilk leftover from the waffles I made the weekend before. I hate tossing out buttermilk when it expires, that is such a waste of a great product. The glaze is optional to add, but I love the gooeyness of it, it adds to the richness of the cake.


Coconut-Lemon-Almond Cake
Adapted from Familyfun.com

Ingredients:
1 cup granulated sugar
3 Tablespoons unsalted butter, melted
3 Tablespoons canola oil
1 ½ Tablespoons finely grated lemon zest
1 teaspoon lemon extract
1 teaspoon vanilla extract
¼ cup milk
2 large eggs
3/4 cup buttermilk
2 ½ cups all-purpose flour
2 ½ teaspoons baking powder
1 teaspoon salt
½ cup sweetened flaked coconut
**Optional:½ cup of slivered almonds**

Coconut-Lemon Glaze
½ cup confectioner's sugar
1 Tablespoon lemon juice
1 teaspoon melted butter
¼ teaspoon lemon extract
¼ cup sweetened flaked coconut, slightly toasted

Preparation:
1. In a medium bowl, whisk together flour, baking powder and salt. Set aside.
2. In a large bowl, whisk together granulated sugar, butter, oil, lemon zest, lemon extract, vanilla extract and milk.
3. In a small bowl, whisk eggs and buttermilk until evenly blended.
4. With a wooden spoon, stir about a third of the flour mixture into the sugar mixture, then alternately add half of the egg mixture and half of the flour mixture, stirring after each addition just enough to blend. Stir in coconut.
5. Pour batter into a 9 x 5 greased loaf pan.
6. Place in a 350 degree oven on the center rack for about 45 to 50 minutes or until a toothpick inserted in the middle comes out clean.
7. When it comes out of the oven place pan on a cooling rack for about 15 minutes before removing the loaf from the pan.
8. While it's cooling, make the glaze. For the glaze, combine confectioner's sugar, lemon juice, butter and lemon extract. Whisk to blend. The glaze should have the consistency of heavy cream. If needed, add more sugar to thicken it or more lemon juice to thin it.

Review: Don't forget your large glass of milk, you'll need it! Yummy!

Honey Sesame Pork

I was in the mood for Chinese food last night, and this dish definitely hit the spot. Eric and I love our usual Chinese place, PF Changs, we have a couple fave dishes that we always love to order. One of my faves is the Honey Sesame Chicken, but I substituted the meat for pork. Most of the ingredients you can find at the Asian aisle of your supermarket, or my fave stores: Trader Joes or Henry's Farmers Market. This was a easy & great meal, and I can't wait to eat the leftovers tonight!!

Honey Sesame Pork
Adapted from My Kitchen Snippets
Ingredients:
1.5 pounds of pork *I used pork chops* cut to bite size pieces
1 tbsp of light soy sauce
1 tbsp of cooking wine
1/2 tbsp of sesame oil
1 tsp of sugar
2 tbsp flour
1 tbsp rice flour or cornstarch
Salt & pepper to taste
Sauce:3 tbsp of sweet chili sauce
2 tbsp ketchup
1.5 tbsp of honey
1 tbsp of oyster sauce
2 tbsp of light soy sauce
1/4 cup of water
1 tbsp toasted sesame seed
**White pepper, just a small amount.**
**Optional:1 tbsp of hot sauce - just to add some heat to the sauce.**

Preparation
1. Marinate pork with soy sauce, wine, sugar, sesame oil, salt and pepper and set it aside for at least an hour. Just before frying mix the 2 types of flour together and mix it into the pork.
2. Prepare oil for frying. Fry pork until golden brown, dish out and drain the oil in paper towel. Remove all the oil from the pan.
3. Mix all the sauce ingredients together and pour it back into the pan. Bring it up to a boil and let the sauce thicken a bit.
4. Add in the pork and toss it gently until the pork is evenly coated with the sauce. Sprinkle the sesame seeds to the pork. I served the dish with stir-fry veggies, brown rice, and potstickers.

Note: You can substitute meat for chicken, beef and shrimp, too. The original dish called for chicken, but I love how pork absorbs the flavor.

Enjoy your chinese take-out at home!!

Monday, March 2, 2009

Pizza night & HG special

Eric is such a lucky husband, sometimes I give him the meal he wants just because he asks for it. I originally wanted to make Cuban Pork Chops last night because the weather was a perfect sunny day, maybe around high 70 degrees or so. Perfect BBQ weather for us. However, Eric would have to clean the BBQ grill up so we could cook up the pork chops. Around 5pm, I asked him what do you want, Pork Chops or Pizza? He said pizza because it's easier. I said fine, let me start dinner. I also made a great salad from Hungry girl, it was a perfect accompaniment.

I bought my cast iron skillet a couple weeks ago, and have been looking for multiple uses of it. I came across Ally's blog for Culinary infatuation and she has made several cast iron pizzas that look delicious! I cheated and bought already made pizza dough from Trader Joe's...hey it only cost less than $1.50 for already made pizza dough. Ally does give a great recipe for deep pizza dough...which I should have done, but I wanted to make dinner in 30 minutes or less. It came out looking soooo good, but I really wanted a crispier crust...which I neglected to pre-cook the dough crust for 5 minutes before putting all my wonderful toppings.

I'm going to make this again using the pizza dough recipe, homemade pizza is always such a treat because you pick your toppings and how much you want on it. :::nom nom nom:::

Deep Dish Skillet Pizza adapted from Culinary Infatuation


Deep Dish Pizza
Toppings:
1 cup mozzarella cheese, shredded
Havarti cheese, sliced finely - about 3 to 4 slices
1/2 cup Quattro formaggio shredded cheese
1 Tbs. dried oregano
pepperoni slices, about a handful
1 to 2 Italian sausage (sliced)
1/2 cup or more pizza sauce* I used leftover tomato soup*
2 Tbs. red onion, diced finely
2 Tbs. red and green bell peppers, diced
2 Tbs. fresh chopped basil

Preparation:
Grease your cast iron skillet and preheat oven to 450 degrees.
Roll dough into a rectangle and using hands make the closest to a circle with the dough as you can using your fists.
Transfer dough to a large cast iron skillet.
Spread dough around the skillet and up the sides. Make it as even as possible.
Layer the marinara and dried oregano and spread spread evenly with a spoon.
Add pepperoni & sausages and then top with the remaining cheese and basil.
Cook on bottom rack for 15 minutes, then transfer to the top rack for about 5-10 minutes so the cheese gets nice and bubbly brown.

Let pizza rest about 10 minutes and cut into slices with a pizza cutter. You're going to need a fork & knife, too!


HG Special Salad Adapted from Hungry Girl
**I omitted the cup of chicken from the original recipe, since I wanted a simple salad.**

Ingredients:
3 cups of romaine lettuce, chopped
1 roma tomato, chopped
1/4 cup of cucumber, chopped
1/4 cup of sliced carrots
1 Tbsp. red onion, chopped fine
1 Tbsp. canned chickapeas, drained
1 Tbsp. canned corn, drained
1 Tbsp. canned beets, drained & chopped
1/4 shredded parmesan cheese *I used mozzarella cheese since I had shredded so much for the pizza*
*added 1.5 Tbsp of Extra Virgin Olive oil & a drizzle of balsamic vinegar*
*Salt & freshly ground pepper to taste.*

Add all ingredients in a large bowl and mix well. I love the beets in this salad, it gives a great flavor!
Pin It button on image hover